May 8, 2017 | Cosplay, Cosplay Tutorial, Travel |
After my visit in Munich I decided to visit with Meermiau the photostudio “Dein Mietstudio” at Kircheim unter Teck (near Stuttgart).
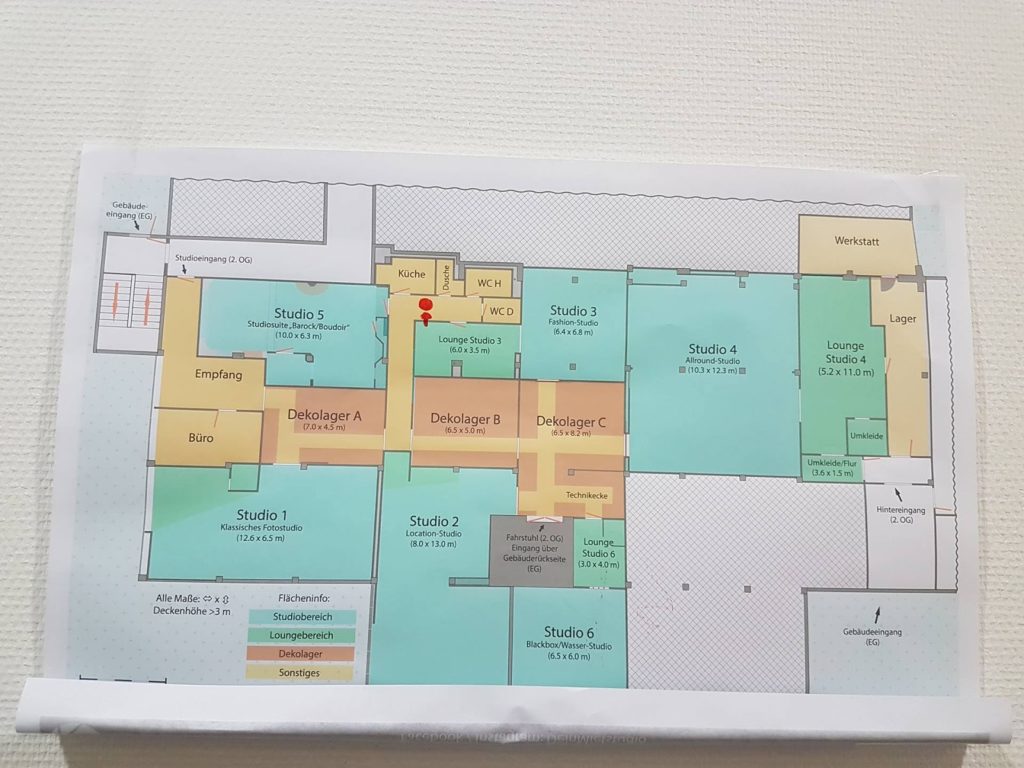
The studio offers 6 different studios:
-> Studio 1
The 55 qm big studio offers a white seamless backdrop.
-> Studio 2
This studio offers 13 different basic settings as well as a small part for seamless backdrops (grey, white, black) at over 102 qm.
-> Studio 3
Is the smaller brother of studio 1 and offers a white seamless backdrop at 44qm.
-> Studio 4
This is with 180 qm the biggest studio they are offering. This studio has 7 different basic settings and also offers seamless backdrops in grey, white and black.
-> Studio 5
Is a 63 qm barock suit in light crème colors, with a big bed, tables, chairs etc.
-> Studio 6
You can rent the smallest studio (40 qm) as a black box studio with a seamless backdrop (white and black) or use it for water photo shootings.
The studio is located at the 2nd floor in an industrial building. Sadly there is no elevator. So if you have a lot of equipment be prepared for an extra sport lesson.
You can rent the studios for minimum an hour and have the exclusive usage of them for the rental time. You can rent the studio at their homepage.
 |
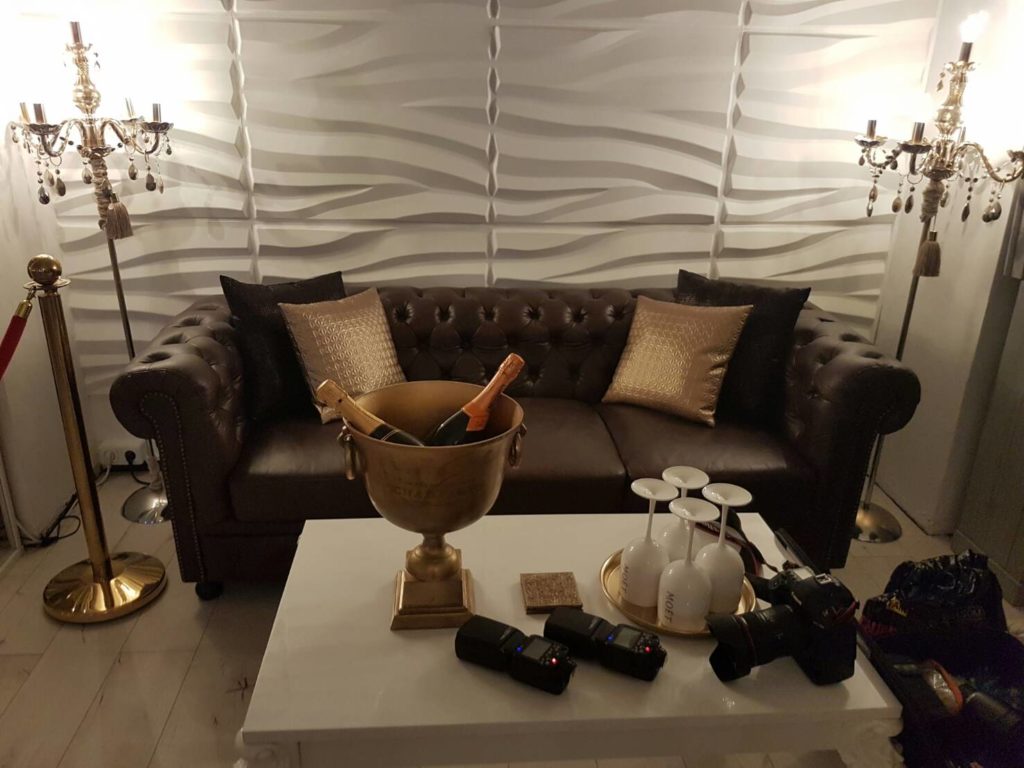
| Changing area |
All rooms are equipped with a music system, changing room with mirrors and amenities, a wardrobe, chairs, table, coffee machine (also latte Macchiato, Cappuccino etc) and drinks (for a small extra free). Every room has his own light/ flash equipment set which you can use freely (included in the rental).
Some studios are including a parking place in front of the studio (Studio 1 and 2). If your studio don’t have a parking place, you can park your car near to the studio for about 3 Euro a day.
The studio rooms are your private space until the renting hours are over. Unlike at other photo studios the owner wont interrupt you unless you call him with the phone, you can find in every studio.
If you rent a studio you are free to use the requisites to your liking. Just be sure to bring them back afterwards.
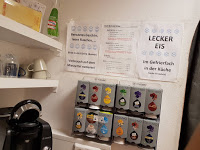
For the waiting time you are free to use the kitchen (fully equipped) free Wifi, the small library in the waiting room or the Pokestop directly at the Studio.
If it is your first visit you have to come a bit earlier, because you will get some instructions regarding the studio. They will show you around and explain you all the rules. Normally it takes about 30-15 minutes.
If you don’t need the instructions any more, you cant go earlier than booked to the Studio. If you insist going in earlier for preperations (and if the room is available) they will charge you.
 Free prop rental:
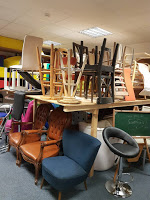
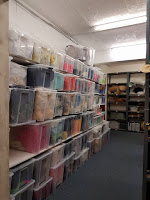
The studio offers 3 rooms full of props of every kind. You are free to use which ever props your want during the rental hours.
They offer different furniture’s, colored fabrics, special items like umbrellas and more.
I really like the variety of props they offer. Sadly the props are mostly not compatible to each other.
You could feel that they were just bought randomly. I am used to rental props which are compatible to each other in several ways for several purposes.
But if you use them wisely and have the time I guess, you can build up a really good setting with all these props.
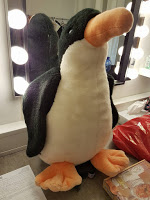
And they had a super cute penguin!!!
I wanted to take him home ToT
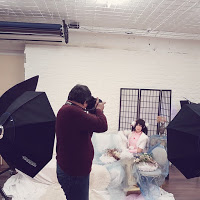
We rented Studio 2, 5 and 6.
Because the studios are closed for other people I didn’t had the chance to check them out. This is why I will only report about these 3 studios.
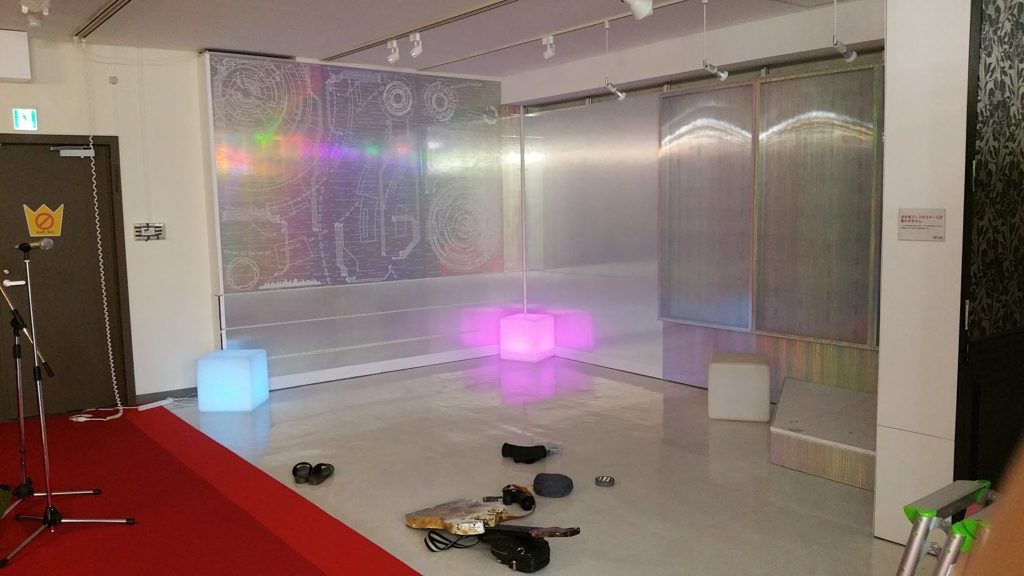
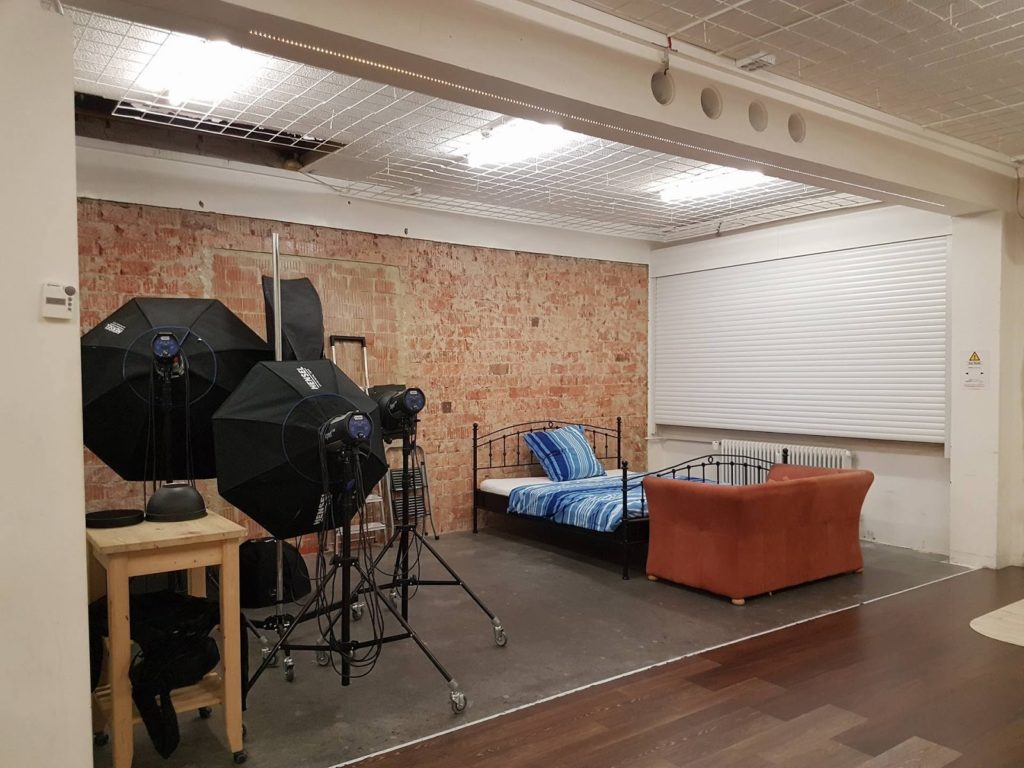
 Studio 2
had different settings and some furniture’s. You could also rent a snow machine for this room.
You can rent this studio staring with 22 Euro per hour.
The settings were super basic and you only had 1 wall for every setting. Beside 1 corner, which had the same background.
It was super difficult to make pictures, cause you were only able to took pictures at an straight angle or from above. The walls weren’t really high and the owner didn’t paid attention to the upper parts and the ceiling of the studio. You couldn’t do any low angle shoots. It was really annoying, after you got used to cheap Japanese photo studios which always offers at least 1 corner with the same setting per setting/ room.
As you can see in the pictures, the settings are not furnished at all. You are more or less forced to use the props and build up your own settings, which wastes a lot of time.
I also was super unhappy, that you could only use the snow machine at 3 different settings.
The floor was a simple concrete floor and not very beautiful.
In the end we didn’t used the snow machine, although we paid for it. It was impossible to get good pictures with this ground.
We decided to built up our own small setting and ended up doing close up shoots.
 My opinion:
Compared to German studios this studio is with 22 Euro per hour reasonable. You can try to share the studio with other people, because there is a lot of space.
If you are fine with close up pictures and really limited options due to their settings this studio is fine. Just be prepared that only straight shoots with limited options are possible.
You also need to consider in your rental time, that you need at least 1 hour to build up your setting and another 30 minutes to clean everything.
Compared to Japanese studios, Studio 2 is super expensive and very badly equipped. The options are too limited and you are actually better of just to rent a seamless backdrop or a small studio or space, where you can build up your own setting for a cheaper price.
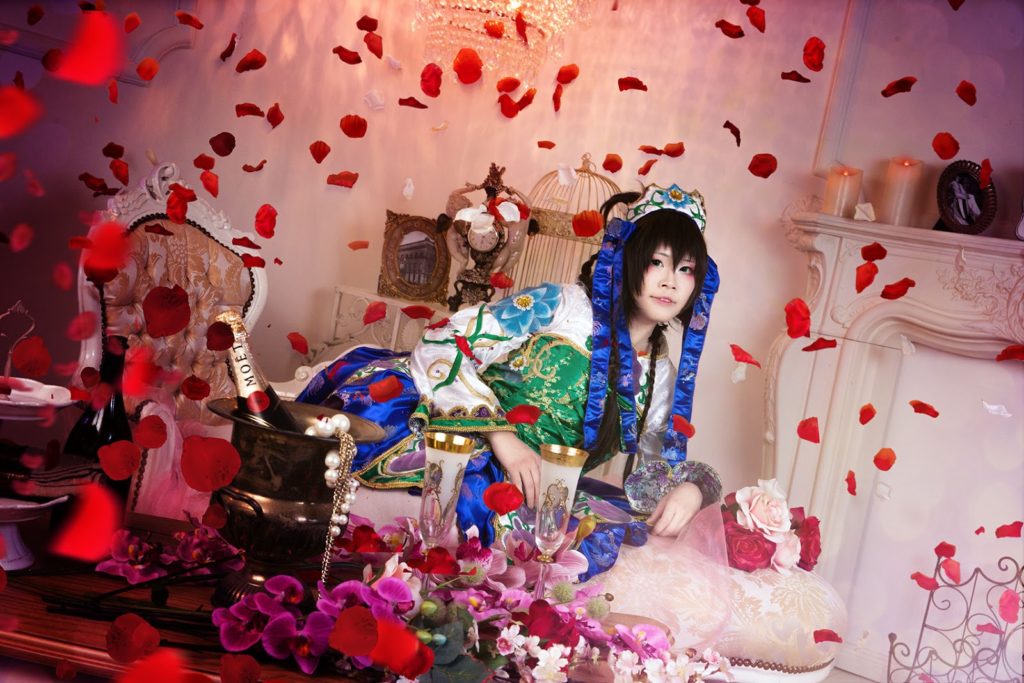
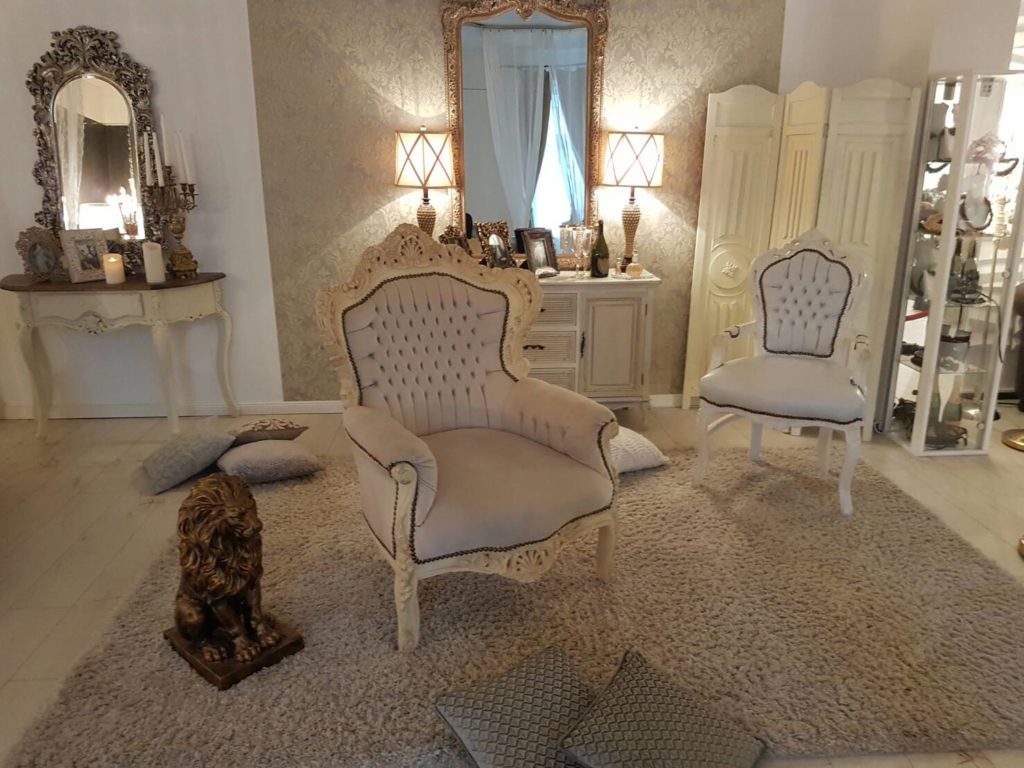
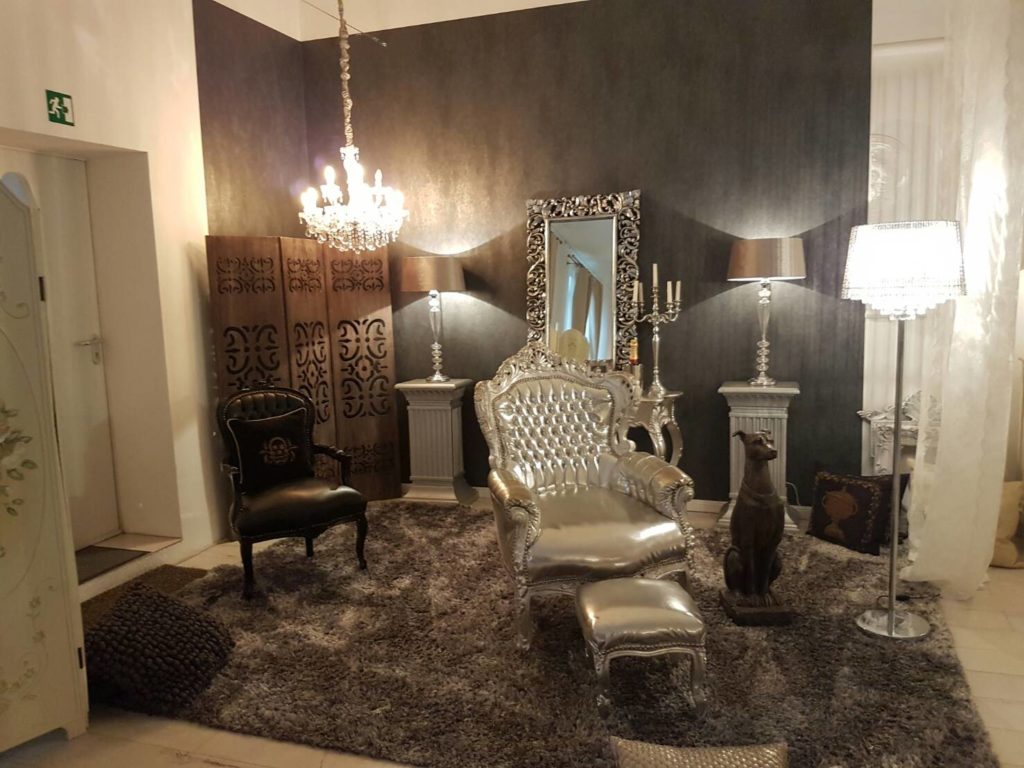
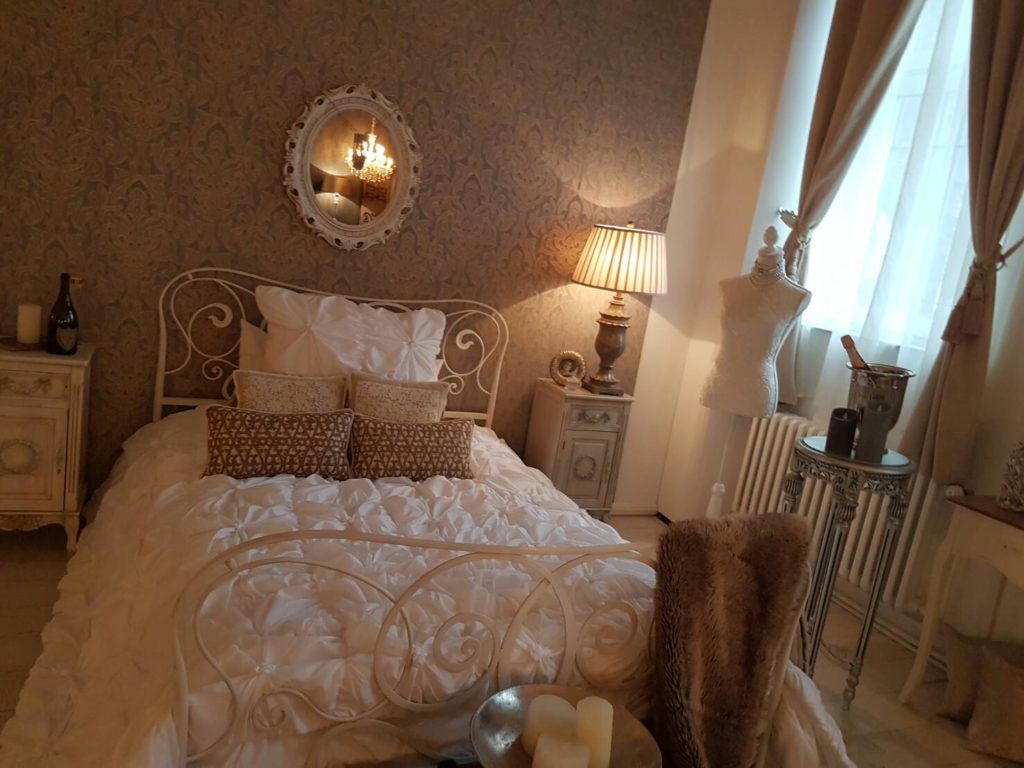
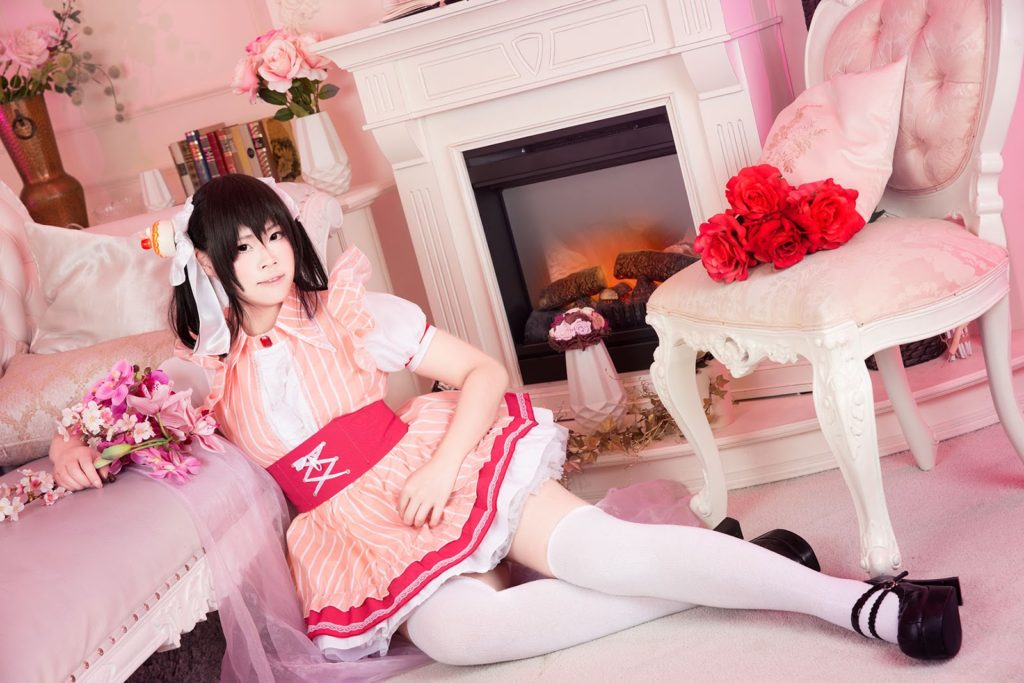
 Studio 5
was a fully furnished barock suit. This time you had an whole room as one setting.
In this room, the owner even payed attention to the ceiling.
The room offered a bed, a (fake) fireplace, a sofa, a chair and a table, a library and basic decoration.
Even the changing room is held in the same style as the room.
You can rent this room starting with 24 € per hour.
You are not allowed to eat or drink in this room (only in the changing room and technical room) and need to put of your shoes.
You can wear shoes inside, if they are part of your costume and clean.
Basically it’s a very nice idea and for German standards a very nice studio.
Sadly we experienced during the shooting, that we were very limited in our options.
While the walls in the downer parts were decorated nicely and some corners had a lot of details, some parts in the room were too plain.
Because everything was hold in light colors, but the walls didn’t had any details or beautiful wallpapers the room looked too plain.The balance was very difficult.
Of course if you are renting a room like this, you want to show the most beautiful parts of this room and not only a more or less plain background or risking an unbalanced picture.
This is why we started to rearrange the room and decorated it with a lot of different props.
Sadly this also took a lot of time and we were again really limited in our options and angles.
It was a bit better than in Studio 2 but still really unsatisfying.
 |
| Studio jolite |
My opinion:
If you compare it to the Studio jolite in Bochum, the ceiling was much higher and the settings were decorated so nicely and in a super balanced way. Of course we also needed pay attention to the balance in the picture, because even the wonderful wallpapers of this studio appeared plain compared to the settings. You still had a lot more options and didn’t wasted time to decorate the setting from zero by your own.
If you are ok with a plain looking Barock suit, because you want to make low key shootings or don’t want a too detailed background, I still would recommend this studio to you.
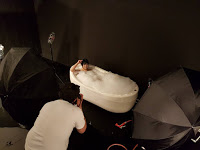
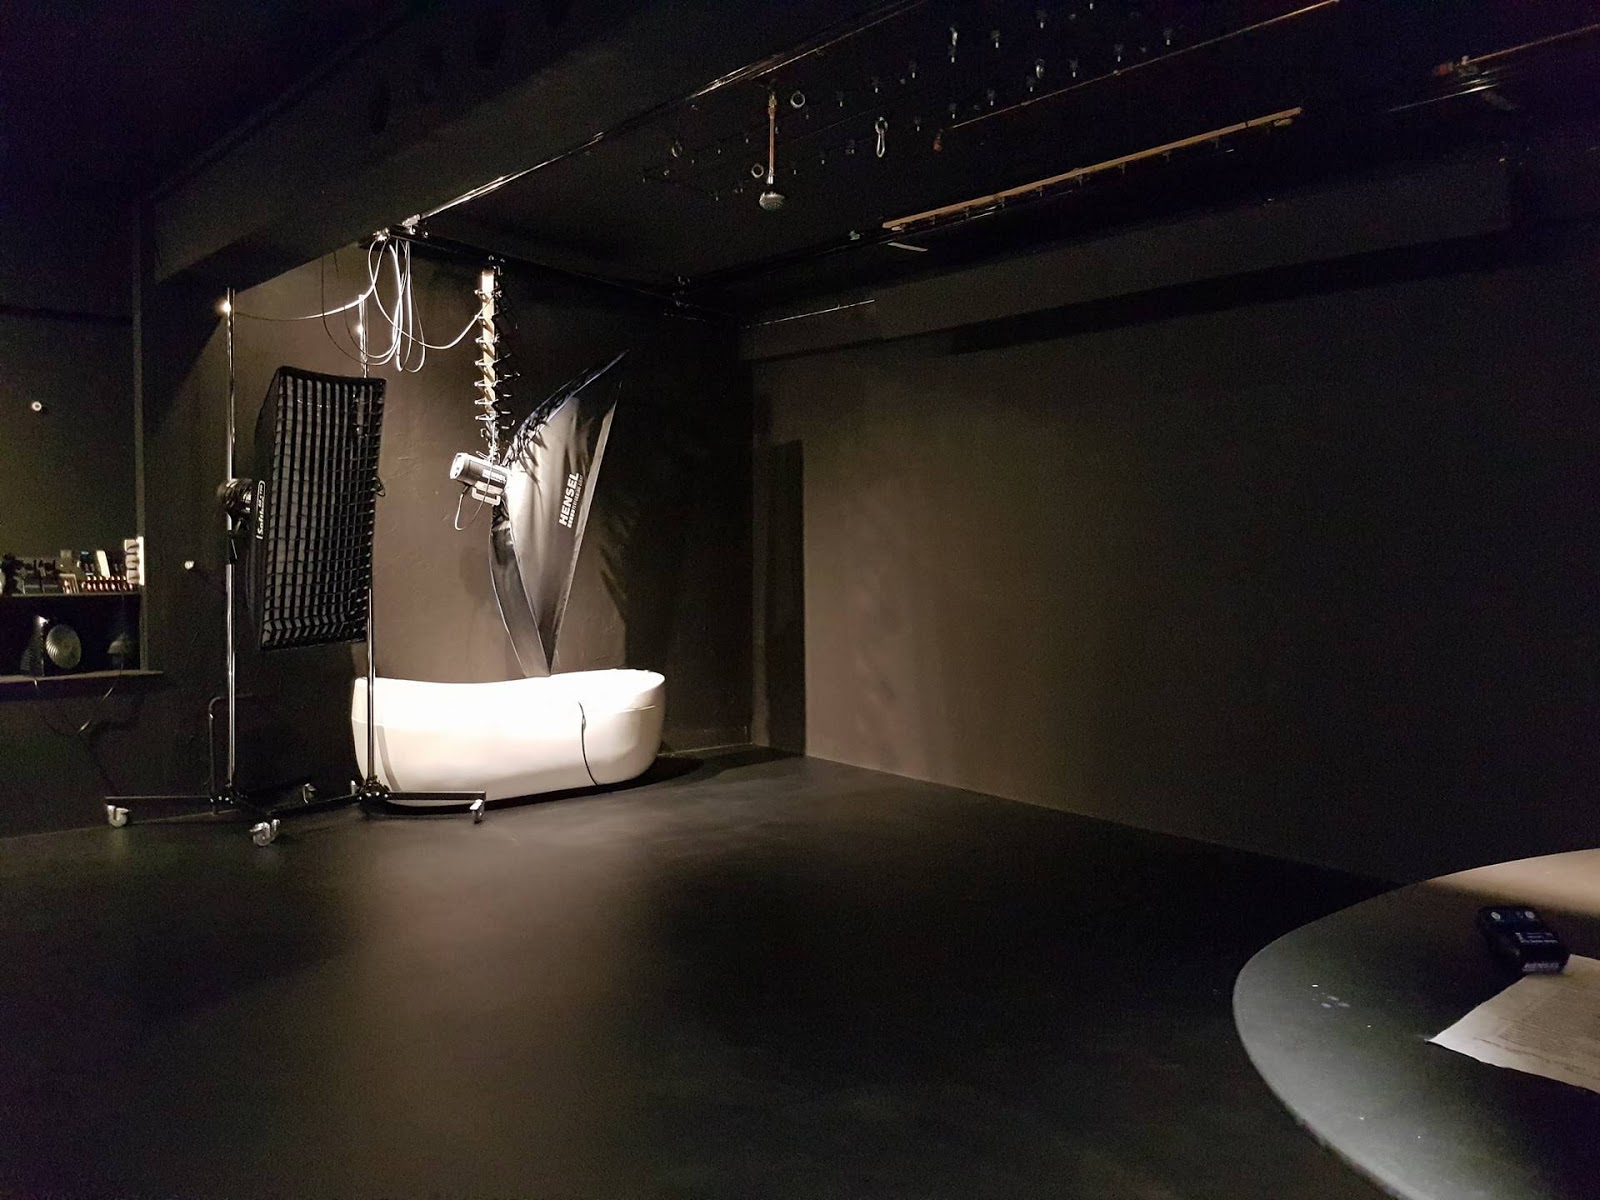
Studio 6:
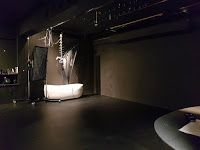
We booked Studio 6 for the Waterworld. You can also rent this studio without the waterset option for 17 Euro per hour. You pay an additional fee of 40 Euro for the water option.
Next to the 40 Euro you need to pay 2 hours extra for the preparation of the Waterworld and plan 1 hour for the cleaning of the room, which you have to do by yourself.
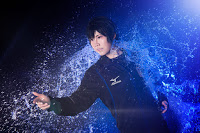
 The Waterworld offers 3 different watertypes:
– drizzle
– rain
– different shower heads and tubing’s (just water from a tube)
With 5 different water connections
You can choose the temperature of the water exactly and we used this studio 8 hours non stop. And after 7 hours the boiler gave up.
It is actually a very good time, because we didn’t payed attention to the water usage at all… Unlike at the rain studio in Wuppertal.
The water is generally coming from above. If you want water from the side or from below, you can use the shower heads.
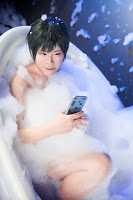
They also offer a bathtub with whirlpool functions.
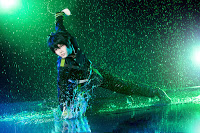
The Studio 6 is a closed black room, which is why you are allowed to splash around however you like. You just need to be careful to a certain corner were the batteries and flashes are stored.
If you want to make splash shootings, this location is just perfect. Because even the ceiling is painted black, you could take pictures from a lot of different angles.
The drizzle option is super useful, cause the rain is super fine and it is more like a wet fog instead of rain. I really liked it because you are not getting wet immediately and still have the rain effect.
The bathtub was the highlight for me. Because we still had some spare time we decided to give it a try. The studio offers foam soap and we used the snow/ foam machine to create a nice background. It was really really fun and comfortable.
After the shooting you can use the towels of the studio or the bathrobe.
Sadly the changing room is not allowed to get wet (but you need to cross it if you want to change or go to toilet). So if you are trying to leave the studio room, you need to be super careful with your wet hair and cloths. It was sometimes really difficult to get yourself through this room without making the floor wet.
 My opinion:
Compared to Wuppertal you had more options regarding the shooting angles in the Studio 6, because you have a completely black and closed room. I also really loved the drizzling effect and that you could do splash shootings without being afraid to drown everything.
What was lacking, was the “small” pool we had in Wuppertal.
The water was gone very quickly, this is why you couldn’t jump or move into the water in order to get a small splash effect.
While in Wuppertal you don’t really need to clean up everything by yourself, you really need minimum 1 hour to get everything clean in this studio.
Especially if you played around with the bathtub and foam.
 |
| Uwe Lammer Studio in Wuppertal |
In Wuppertal you could see the seams of the mats at the ground of the rain set. It is generally very difficult to photoshop rain pictures, so it was really difficult to get ride of this seams.
In the waterworld, the ground even and completely seamless.
 |
| Dein Mietstudio in Stuttgart |
If you are going to rent this studio you should bring at least 1 assistant.
Someone who is regulating the rain flow, making the splashing or holding the foam machine.
Actually if you can, try to bring 2 people and if you can come in swimwear. Cause it is very hot and you will get wet very fast.
The studio has a shower, so don’t be afraid to get wet during this shooting.
My opinion about “Dein Mietsudio”:
If you need a simple studio, reasonable priced with good light equipment this studio is the best choice you can take. The light equipment is included (high quality flashes) and if you share the rental fee with some friends it is super affordable.
I also loved the prop rooms were you could use everything you might need (for the shooting or the penguin for your own happiness!).
If you are fine with simple backgrounds and don’t expect anything special, this studio is the right choice for you. But if you want to make a photo shoot with special backgrounds and decorated rooms, this is not the right place for you. I would recommend the studio jolite in Bochum if you are looking for a barock style photo studio. They are priced similar and you have more freedom regarding the angles and a more balanced background in the studio jolite.
If you are looking for a rain photo shoot I would definitely recommend trying out the waterworld.
It was a really good experience and you have a lot of different possibilities to use the water effects during the photo shoot. The Studio in Wuppertal is good if you need a pool like setting with water from above.
But if you want to splash around or use a bathtub, I would definitely go for the waterworld in Stuttgart.
This review is based on my own opinion.
If you have any questions please don’t hesitate to contact me.
Informations:
Name: Dein Mietstudio
Adress: Aleenstraße 18, 73230 Kircheim unter Teck
May 3, 2017 | Uncategorized |
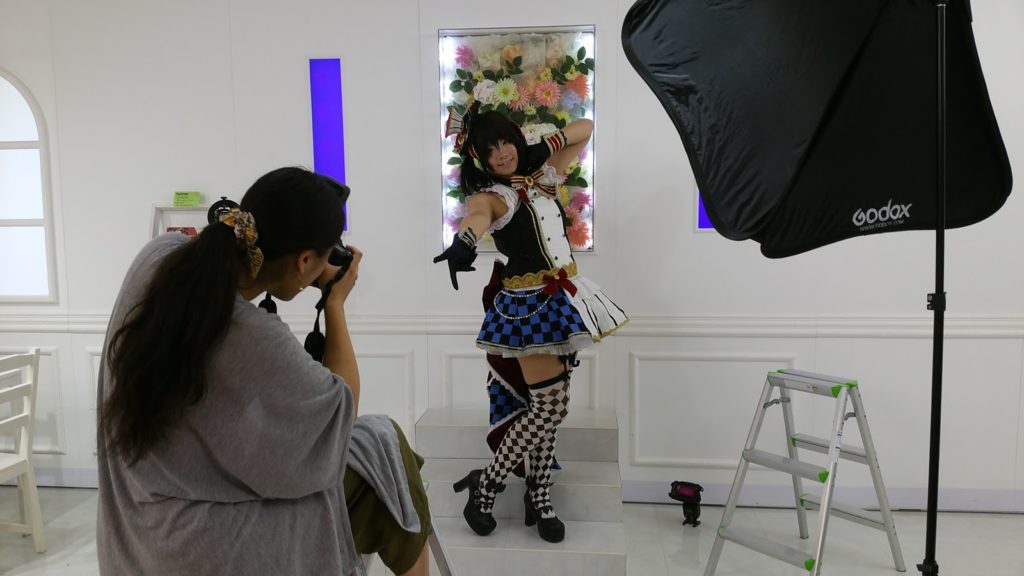
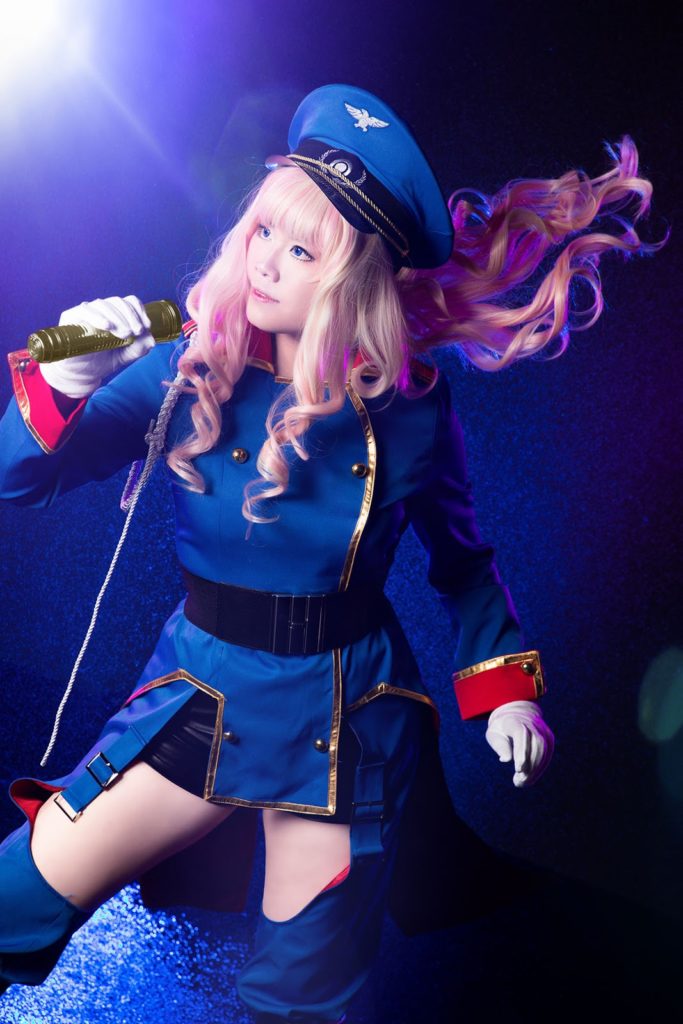
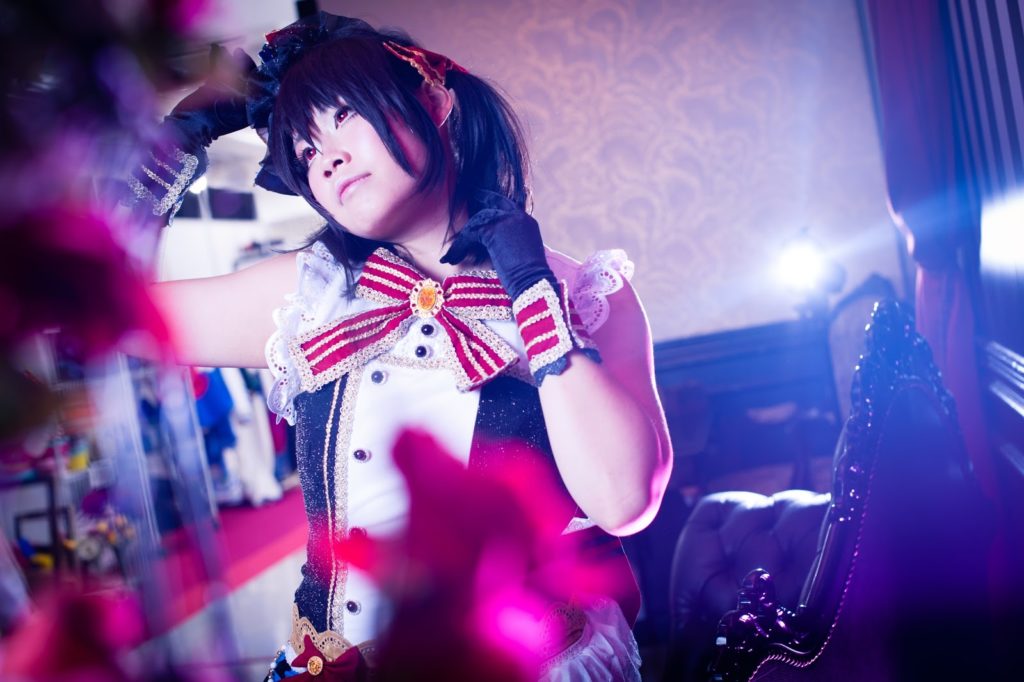
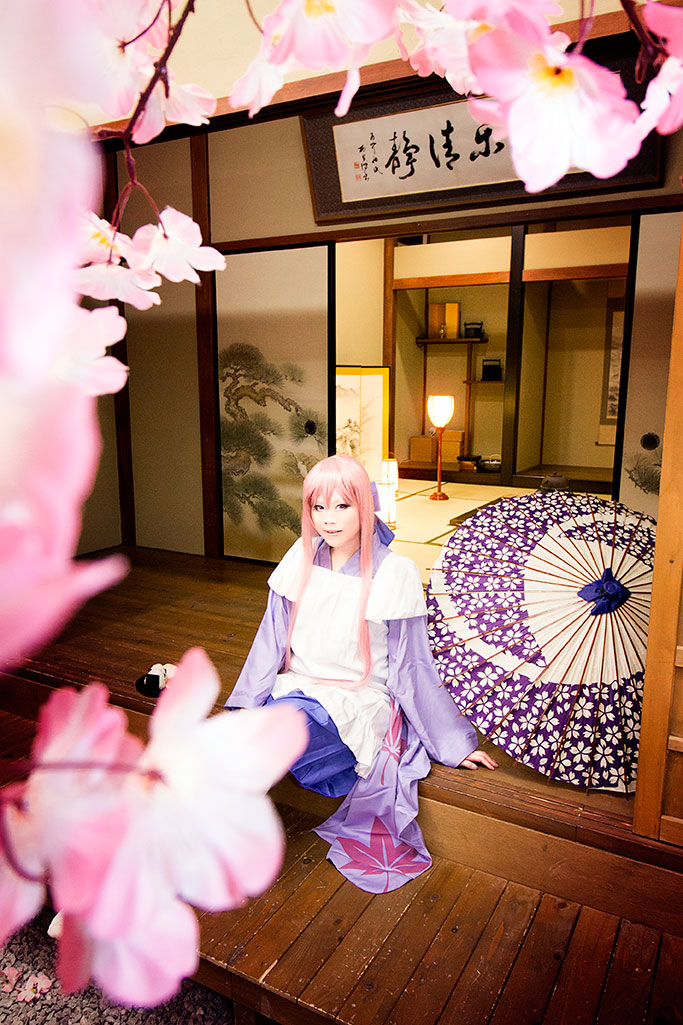
Because my World Cosplay Summit championship costume is very dear to me, I wanted to take pictures at a special location.
This is why I checked the internet and found the photostudio Jolite in Bochum (Germany, Nordrhein-Westfalen).
About the studio:
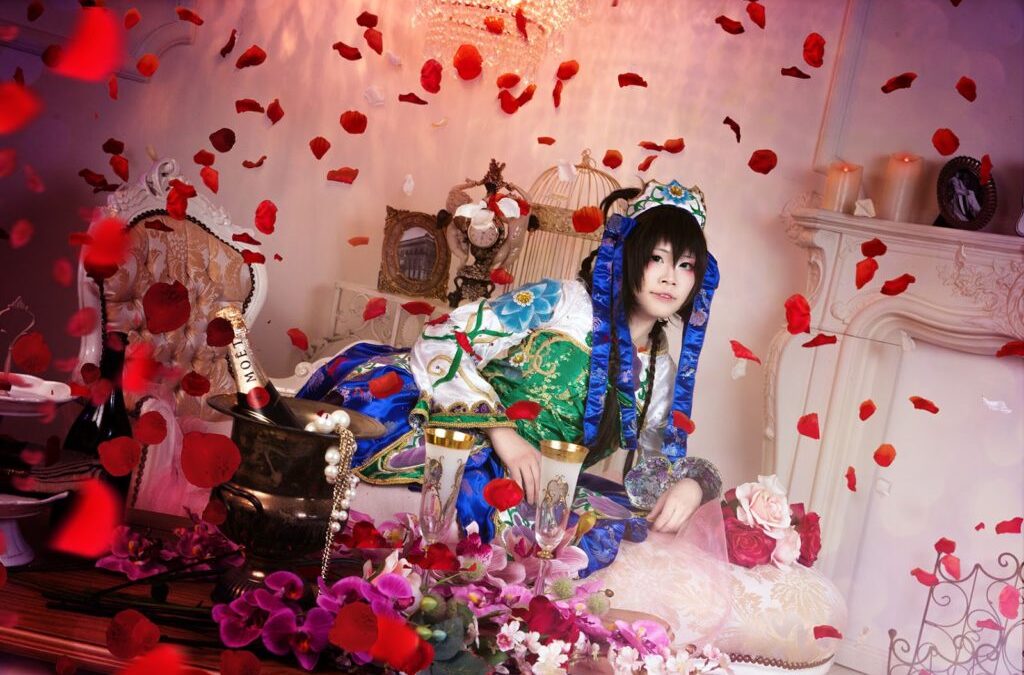
The studio Jolite features 4 different barockstyle living room sets over 85 qm.
The sets are hold in light colors and are decorated with a lot small things.
They also have parking places and a changing room (and a Pokestop if you have some spare time ^_-).
They also offer drinks and a waiting lounge, were you can sit down and rest. They also have a small pool of props which you can use freely during the photoshoot.
You can rent the studio starting with 30 € per hour for minimum 3 hours.
They also offer a studio flash rental if you don’t have your own equipment.
Starting with 5 persons, you have to pay a additional fee (20%).
The studio itself is limited to 6 people (from 6 people, 2 can be photographers).
They also offer a day package starting with 200 € for 8 hours.
Starting from 5 people you have to pay a deposit (350 €).
 |
| The resting place |
Rules:
If you want to rent this studio certain rules apply.
You are only allowed to drink or eat at the designated resting areas.
Shoes with a black profile are not allowed either.
The owner will also tell you to be careful with all cushioned furniture’s. Be careful not leave make up traces at the cushions.
The Studio:
With 85 qm and 4 sets with a lot of different furniture’s and decorations it can be pretty cramped. You still have enough space to build up your flashes. But there is no place for larger groups or larger light settings.
I guess 2 photographers with 2 models each might be possible, but actually I wouldn’t recommend 2 photographers working at one time.
If you don’t have much light equipment it might work, but not if both photographers want to use flashes.
Because the studio has big windows and the interior is mostly hold in light colors, it is pretty bright. But I would still recommend to work at least with 1 softbox to lighten up your model.
If you don’t have equipment I really would recommend to rent some.
The lamps are very dim and not very bright. They are also located directly above you. So if you want to take pictures without flash you are pretty bound to the daylight, which only comes from one direction.
The studio itself has an wonderful atmosphere. I am pretty used to visit studios which look good at pictures, but the sets are mostly build up in large dark storage halls.
This one was a completely different. The owner paid a lot of attention to the atmosphere, especially to the decoration. During our stay we could find so many different details which made this studio really unique.
What I also really liked was that the ceiling high is above 3 Meter. Even with a wide angle lens, we didn’t got any problems with parts of the studio which should not be in the picture.
My opinion:
If you are looking for a barockstyle location for your photoshoot I would definitely recommend to try out this studio. It has a very nice and special atmosphere. It was a really great experience for me.
The most important point was, that this studio offers sets, which are decorated with so many details, that the sets don’t look plain and boring at all.
I visited a lot of studios, where the furniture’s were beautiful. But you could feel that the pictures were taken at a studio, because everything looked so plain and artificial.
This studio is completely different.
A problem was, that black soles weren’t allowed. If I had knew this before it wouldn’t have been a problem. But due to this rules I couldn’t wear my first Adekan Cosplay completely, which was kind of sad.
Another point is that only 6 people are allowed. For me it wasn’t a problem, because I don’t mind spending money for a good location.
But a lot of Cosplayers can´t afford such a studio. Studio sharing is due to this rules nearly impossible.
In Germany it is very difficult to find theme studios with beautiful interior. So even if its not that big and cheap I still would use it again.
Informations:
Name: Studio Jolite
Webside: www.jolite.com
Adress: Harpener Feld 11, 44805 Bochum
Sep 29, 2016 | Cosplay, Japan, Photoshootings, Travel, Travel Reports |
|
| Picture by Hazuki |
The Cosplay studio crown is a studio located near to the Akihabara train station in the center of Tokyo. It is about 5 minutes walk from the station. The studio offers 6-7 different settings, which you can use to make pictures in your Cosplay. You also can rent goods, cameras or camera equipment there and also Cosplays, if you didn’t bring an own one. You are allowed to use the pictures for your personal promotion and Cosplay goods.
The operating times from the studio are 10 am to 10 pm. You pay for the entry once for a designated time and can use the location you like to, as long as they are not occupied by other Cosplayers.
The fees for the 3 hours time frame are quite cheap compared to other studios:
| Timeframe |
Working day |
Weekend/public holiday |
| 3 hours |
1.700 en |
2.400 en |
| 6 hours |
2.980 en |
3.980 en |
| 9 hours |
4.580 en |
5.500 en |
The beginning:
The Studio is located at the 5th floor of a grey building. If you don’t know the address or notice the small sign of this studio, you will most likely pass it. If you found the building, just go into the elevator and get to the 5th floor. Stepping out from the elevator the studio is located to your left.
If you go in you need to put out your shoes first and go to the counter. Just tell the counter which time frame you desire, pay and you will get a number. The staff keeps track of the time with this number. You need to give it back at the end of the rental in time. This means you need to change in this certain time frame.
As everywhere in Japan, it is not allowed to come in Cosplay to the location or the studio. You are required to bring the costume with you and change at the studio or the event. After paying and getting your number you go to the changing room and change into your costume.
 |
| The counter |
The changing room:
 |
| Changing room |
The changing room has a lot of space, some mirrors, a cloth racket, dryer, tissues, cotton pads and Q tips. They also provide a comb or bobby pins for a small fee. There is also a board where you can put your belongings into. Sadly there are no lockers like in the Hacostadium. But because it is Japan, I doubt someone will steal your belongings as long there are no valuable things inside.
After changing I put my normal cloths into my back and put it into the board. If you want to use shoes, which you also wore outside once before, you are supposed to wipe them clean before stepping out to the locations. So I wiped my shoes and got my wallet and Smartphone and left the changing room.
 |
| Changing room |
Shooting:
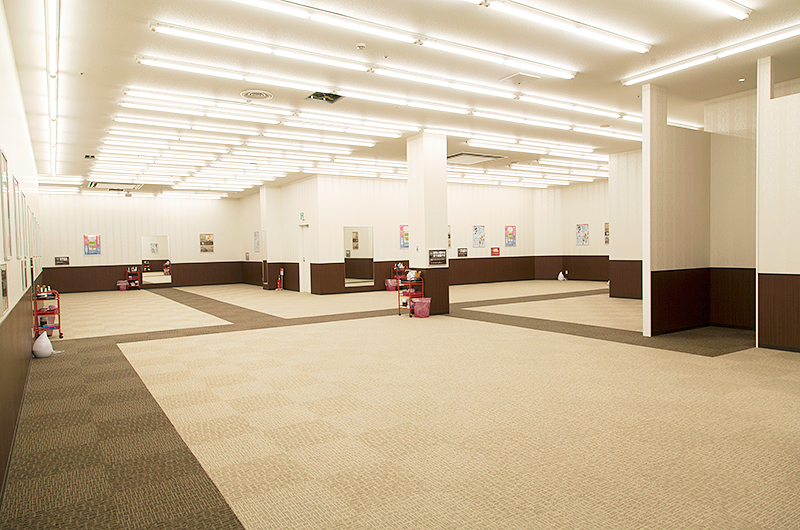
The Studio Crown is compared to the other studios I ve seen so far quite small. But they still have some nice settings. You can choose between 6-7 different settings and also can rent some Cosplay items or camera equipment.
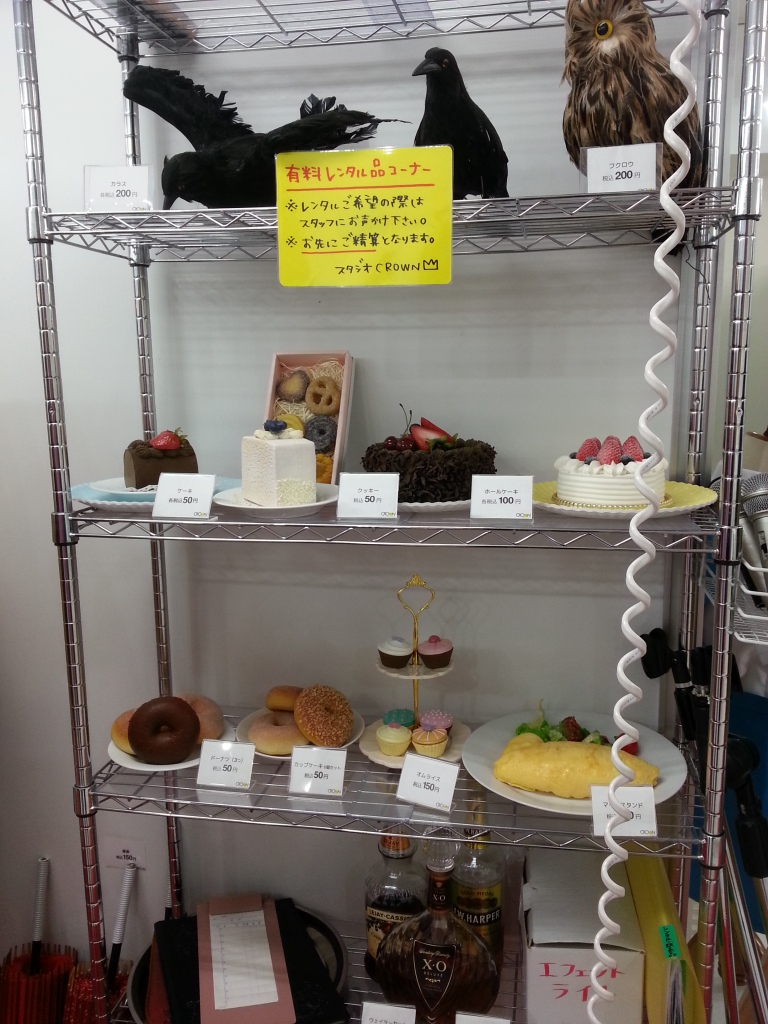
The most rental goods require a rental fee. Some goods can be rented for free. As far as I could see small ladders and reflectors are provided for free. If you want to rent something, take you number and go to the counter. Tell them what you want to rent and they give it to you. If you want to return it, show your number again. You pay when you check-out.
During the shooting you can take a break and get free tea or water.
I really like this service. You can sit down, check the pictures and rest.
I took some pictures of the different shooting locations:
Like at all the other studios, you have to bring your own photographer. But they also seems to offer an full experience course, where you can get make up, costume and also a photo shooting with a photographer provided by the studio. For this package you need to reserve beforehand.
You are allowed to use all locations to your liking and also to change between them.
Just be careful not to disturb other Cosplayers or to block for a too long time a location. Japanese Cosplayers don’t wait openly, but others might be interested in shooting at this location, even if you don’t recognize. Also be sure not to take pictures of other Cosplayers if you haven’t asked them for permission.
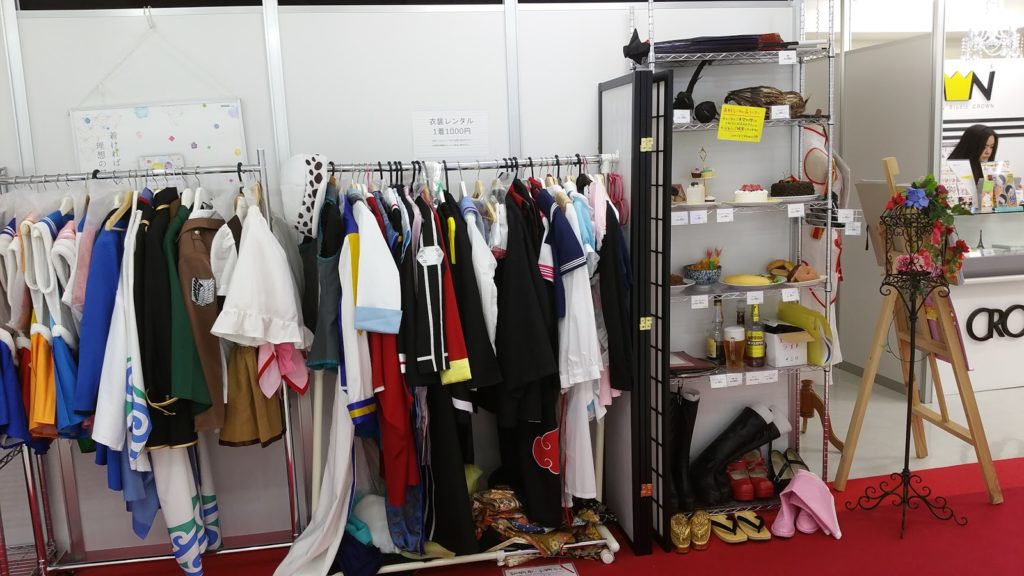 |
| Rental goods |
If you have problems or need assistance you can always ask the staff. Just keep in mind they only speak Japanese. (But if you book the package, I guess there will be some English speaking stuff, because the package is targeting foreigners and is only available at the English website.).
 |
| Picture with the help of the staff by Hazuki |
After the shooting:
When you finished with your shooting, keep in mind that the time frame also includes your changing time. So you need to change about 30 minutes before your time runs up. You just go back to the changing room, change back and return your card with the number to the counter. If everything is ok, they will thank you for using the studio. If you overstepped your time or rented things, they will charge you.
If you still have time try out to write into their guestbook. You can put some pictures inside, draw something or just write a message. I really liked to go through it, because a lot of foreigners seem to visit this studio and wrote very interesting and nice things.
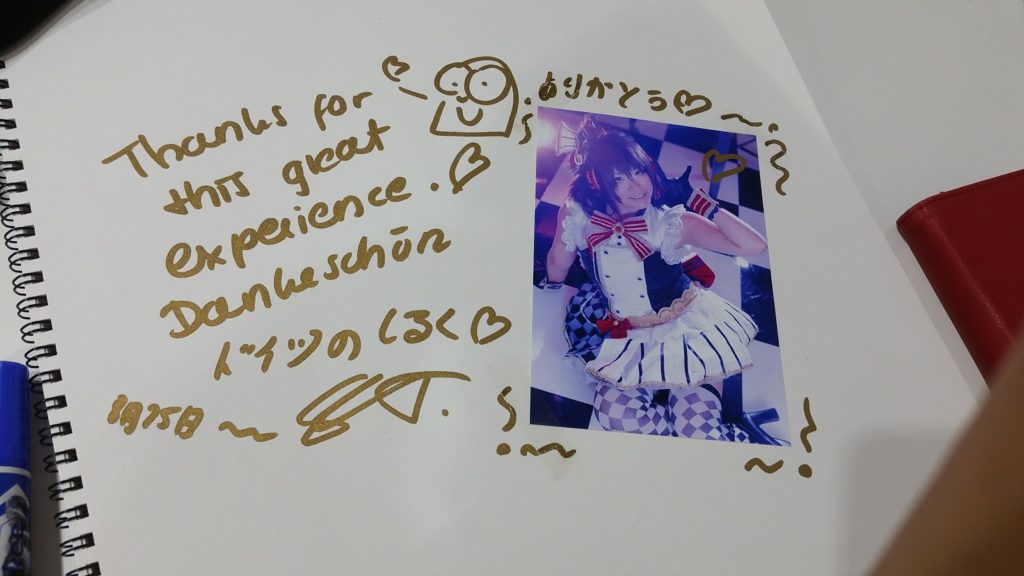 |
| Guestbook |
My opinion:
What I really appreciate is the location and the easy system.
The studio is located in the center of Tokyo, just 5 minutes walk from the Akihabara JR station. You neither need to reserve, nor to get a membership. So even if you are a foreigner, it is super easy to use this studio. You don’t need to provide an ID card and also don’t need a Japanese address. Like everywhere the staff couldn’t speak English. But I saw that they are quite accustomed to foreigners, because I saw a lot of signs in English and Japanese. I also like the idea about the Cosplay experience package, where you can get Make up, a Cosplay and even pictures.
Compared to the other studios the 3 hours course for 1.700 Yen seems quite cheap. But it does not include a lot of free rental items and also don’t include amenities like bobby pins, brushes, wig sprays etc like the Hacostadium. I personally don’t need it, because I mostly bring my own things, but I saw that a lot of Cosplayers are making use of that service. They also only provide about 6-7 settings, this isn’t much if you compare it to Hacostadium. But you need to keep in mind, that space is very rare in Tokyo. Especially in Akihabara in the very center of this town.
 |
| Picture by Hazuki |
In my opinion it is a good choice for first timers, who want to experience the Japanese way of Cosplay and to try out a studio without the hassle of getting a member ship or getting through the language barrier. You don’t need to fight against the other Cosplayers for your space in the changing room and even have proper chairs and mirrors to get ready. Because of a limited number of settings you can concentrate more on one setting and get used to it. I also liked it, that you can go shopping and get some nice food with friends before or after the shooting. The location is a big plus!
Facts:
Operating hours: 10 am – 10 pm (no closing days)
Free: 1.700 en -5.500 en
Address: 2 Chome-4-6 Sotokanda, Chiyoda-ku, Tōkyō-to 100-8111, Japan (5th floor)
Map:

Jan 13, 2016 | Cosplay, Cosplay Tutorial, Japan, Photoshootings, Travel, Travel Reports |
 |
| Picture by Meermiau |
I wrote an blog about Cosplay photo studios in Japan:
Some people asked me if I could write about specific Cosplay studios which I visited and would recommend to other Cosplayers.
If you can speak fluently Japanese and read/ fill out forms I would recommend the studios of
Hacosta. If you cannot speak Japanese you should bring a fluent speaking Japanese friend with you. If not you might be in trouble.
Although the staff is very kind, they don’t speak a single word English. They searched several times for me in order to explain things to my not Japanese speaking friends. The rules in the Hacosta studios are quite strict and you may get kicked out.
You also should not come dressed in your Cosplay. Always dress and change back at the studio itself. If you are coming dressed they might refuse your entry.
Hacosta
is a company which owns several studios in Japan:
Hacosta only owns share studios. You are paying an entry fee for a certain time frame (1.900 yen (5 hours)- 4.800 yen (10 hours)) and can use every photo setting which is not occupied freely. The time frame includes your changing and Make-up time.
You are allowed to use the pictures freely as long is it for your own promotion. Even making photo books/ print items and selling them is permissible.
The studios are offering lockers, changing rooms, a small restaurant, Cosplay goods, rental services and free Cosplay amenities. Hairspray, combs, bobby pins, cotton pads, scissors and more can be used for free.
The rooms are equipped with artificial day lights and can be turned off. You can find reflectors and ladders scattered all over at the studio. They are for free usage.
Hacosta only offers the studio settings. I haven’t seen any photographer service. So if you want to visit this studio always take a friend with you, who will make the pictures.
In Japan it is quite common just to go with a group of friends (all Cosplayer) and to take pictures of each other.
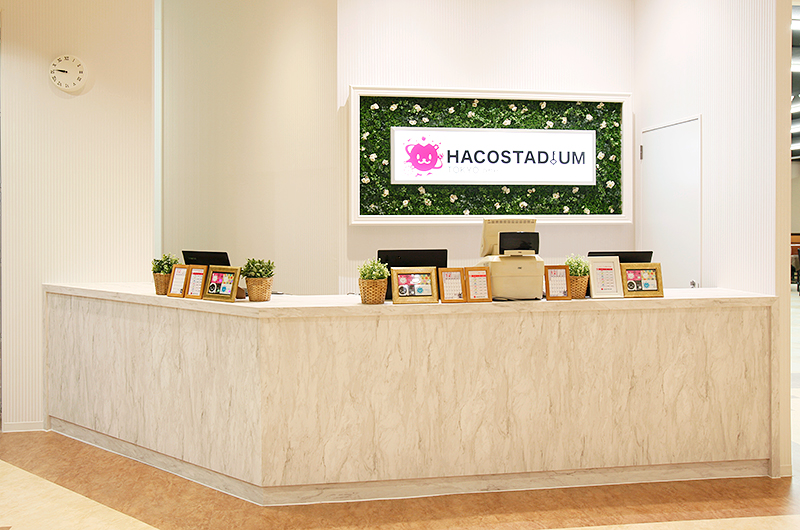 |
| Ticket counter (Picture by Hacostadium.com) |
Hacostadium Tokyo.one
claims to be the biggest Cosplay photo studio of his kind and offers more than 40 different settings. This studio is the newest one of Hacosta and has been opened at the end of November in Funabashi.
You should be aware that traveling to Funabashi will take at least 1 hour or more from Tokyo Station. If you are looking for an easier accessible studio, go for Ikebukuro or the studios in Osaka.
We decided to go for Tokyo.one because we wanted to enjoy such a studio as much as possible. So why not trying out the biggest studio in the world?
Presale:
I highly recommend buying a ticket before head. It will make things much easier and you can be sure to get an entry ticket. Hacostadium announces daily at twitter if tickets are still available. I noticed that you definitely should use the presale if you intend to go on Friday – Sunday, public holidays or event days.
On normal weekdays it shouldn’t be a problem. But you should try to be there at 9:30 am (opening time), to be sure to get a ticket.
 |
| Staca (Picture by Hacostadium.com) |
If you want to reserve you need to create a Staca account. Staca is the membership of Hacosta and you need this membership for everything you going to do in these studios.
After you created an online account you can just go to the calendar and buy your desired ticket. Be sure to fill out the forms correctly (the Google website translator don’t work on this side), it might cause trouble afterwards.
Be aware that you are booking the right studio/ day and time, because the tickets are not refundable. If you are going with friends everyone needs an own account. You can buy tickets for other people but need to pass the tickets to your friends online. So if they don’t have an account buying two tickets won’t help you because you cannot pass the ticket to your friend.
You will be named as ticketholder and the entry of your friend might be refused.
Also going to a Hacosta studio before head without a membership won’t help you, because you need a Japanese phone number for a presale ticket. If you already have a membership just going to the nearest Hacosta studio and buying a presale ticket works.
Ticket:
|
Ticketprice
|
Time frame
|
Normal
|
Presale
|
|
Weekdays
|
9:30-20:00 (10,5 hrs)
|
3.500 yen
|
3.200 yen
|
|
9:30-14:30 (5 hrs)
|
2.300 yen
|
2.000 yen
|
|
15:00-20:00 (5 hrs)
|
2.300 yen
|
2.000 yen
|
|
Weekend and public holiday
|
9:30-20:00 (10,5 hrs)
|
4.800 yen
|
4.500 yen
|
|
9:30-14:30 (5 hrs)
|
3.200 yen
|
2.900 yen
|
|
15:00-20:00 (5 hrs)
|
2.900 yen
|
2.600 yen
|
I already got an account on Staca but because my friends couldn’t manage to go through the Japanese page I didn’t bought a presale ticket online (because a refund is not possible).
So we checked if day tickets were still available and just went there.
The studio is located in a shopping mall. Hacostadium opens 30 minutes earlier than the mall so you have to wait at the main entrance (there is a Hacostadium flag). The staff will fetch you up and bring you to the ticket counter.
If it’s your first time you have to fill out some forms and than move to the ticket counter.
They will check your address and personal information’s. So be sure to bring an ID card which also contains your address. Because the staff couldn’t speak English she gave up asking my friend for an ID card with address…. So I am not sure if maybe a passport will just be enough.
In my cased they told me an ID card with address would be required.
I realized that the staff where panicking when they saw us and looked relieved after I started to translate. If you Japanese aren’t that fluent just give them a bit time. They have prepared English sheets for the ticket sale (but I guess only for the ticket sale…). They will do the registration silently while they are speaking to other costumer’s non stop.
After checking our personal information’s they will hand out your Staca card and give you a badge with a locker number.
From now on you are a Staca member and can earn Staca points. Which everything you are buying (even food and items) you can earn points and get a discount on the next ticket.
Changing:
 |
| Female changing room (Picture by Hacostadium.com) |
You can use your locker freely the whole time frame. You can place your whole things there and don’t need to drag them around with you.
Next to the locker are private changing rooms. You can use them but normally you are using the big changing room. It is a big hall with some mirrors. You also find cotton pads, bobby pins etc there.
You just go there, sit down and make your make up and changing. It is quite common for Japanese to undress in front of others from the same gender. So don’t be bothered.
I would recommend to bring an own small mirror. We were lucky, because we were one of the first costumers there. But after a while the places with a mirror have been occupied.
Just try not to spread your things to much in order not to disturb others or to take too much space. Pictures are forbidden at the changing area. Also refrain from cutting your wig. Hacostadium provides an extra room for wig cutting which are equipped with scissors, combs and hairspray.
After changing you just put your things back to the locker and are ready for a shooting.
 |
| Studio settings (Picture by me) |
Shooting:
Hacostadium Tokyo provides over 40 settings which are greatly designed and maintained.
Be aware that some shooting locations are the hallway which everyone uses. Try not to disturb other Cosplayers. If you want to cross a room or a hallway while people are shooting, please ask politely.
If a room is occupied, don’t just go to another corner and make pictures there. Wait until they are finished, but try not to wait too obviously.
Before entering a setting there are wet tissues for your shoes. Please clean your shoes before entering the settings in order to keep them clean.
At some settings shoes are not allowed. You can recognize these places with a shoe shelf at the entry (of course there is also a sign in Japanese). Put your shoes into the shoe shelf and go in. Even if you are wearing clean “Cosplay shoes” please refrain from taking them in.
You are allowed to use everything in the room you can find and to change the setting to your liking, just be sure to put everything back to his place.
Generally drinking and eating at the shooting area is permitted. But you are allowed to drink and eat at the café settings. I saw a lot of Cosplayers bringing their McDonalds breakfast to the café setting and to make pictures while having breakfast.
As a Cosplayer:
Try not to wear Cosplays which are taking up too much space. Also wear shorts if you are wearing a short skirt.
As a photographer:
Regarding to flashes and photo equipment there are a lot of rules, because you may block the way while shooting at the hallway. You are only allowed to bring a limited number of flashes, soft boxes etc. Please inform yourself before head to avoid trouble.
Don’t just take pictures of other Cosplayer. Please ask politely if you want to make a picture.
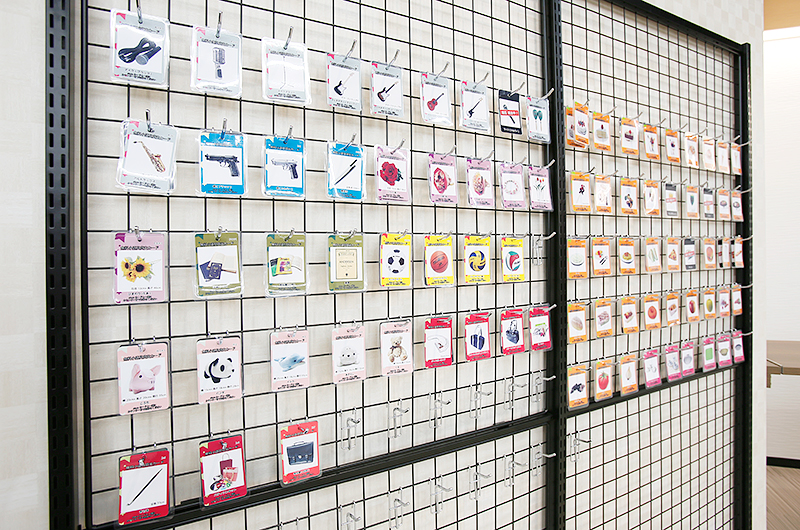 |
| Free rental items (Picture by Hacostadium.com) |
Rental services:
I really like, that you can rent Cosplay accessories for free. You can rent as much items you want, as long as you want and just return them after the shooting.
Next to the service counter you will find a wall with paper cards. Just take the paper cards which are showing the desired items, take them and go to the service counter.
The staff will gather your items, give you a bag for an easier transportation and scan your Staca card. When you are returning, they will check if you have returned everything and scan your Staca card again.
Afterwards you can rent new items for free.
You also have the possibility to rent a Nikon or Canon camera for free (2 hours) afterwards they will charge you 300 yen for the rest of the day.
They also provide flash, soft box, lens, SD card etc. renting service. A lot of items are free for the first 2 hours. You won’t pay more than 1000 yen for a rental (mostly about 500 yen). I think this is a good an affordable choice if you cannot bring your own equipment or just don’t have any space in your baggage left.
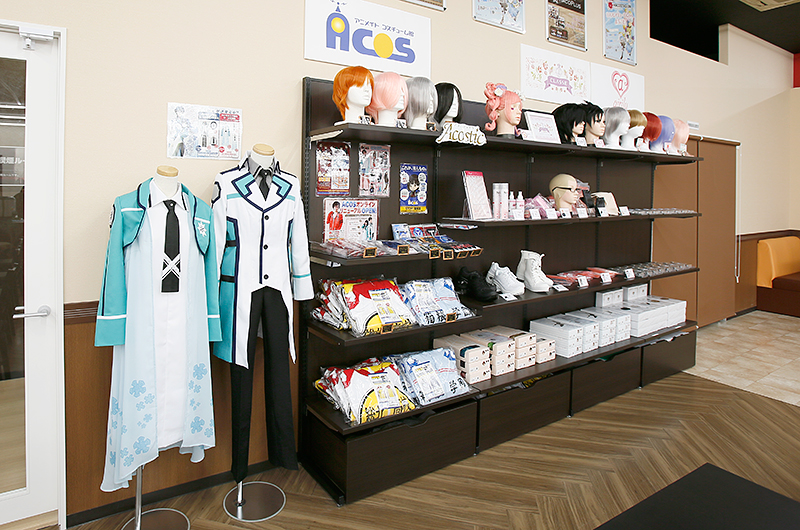 |
| ACos shop (Picture by Hacostadium.com) |
Hacoplus:
Hacoplus is the restaurant and ACos area which you can find directly at the entrance,
The food is very affordable and tasty. You can also get the food and bring it to the café area setting to make pictures with it. The staff always tries to let the food look good. That’s why you can use it as a shooting accessories without hesitation. The restaurant also provides free water.
If you forgot some Cosplay items like wigs, contact lenses etc. you can buy them at Hacoplus. They only have a small corner with Cosplay goods but still enough to rescue yourself last minute.
Personal opinion:
I was a bit shocked how helpless the staff was regarding to my non Japanese speaking friends. My friends had a lot of trouble with communication and they were always searching for me. I was even surprised how much you need to communicate at such a studio (otherwise I would say; Ok just don’t communicate).
But all in one the staff was super polite and friendly, always gave their best to make it as comfortable as possible and were cleaning non stop. It was so clean…. Japanese toilets are great and clean but the most luxurious toilets I have seen in Japan were at Hacostadium and the Butler Café….
The settings are just amazing and very well maintained. The variety of free rental objects are great. The possibilities are just awesome and not even a bit comparable with the situation we have here in Germany.
The light was very good (although you really need a flash) and the other Cosplayers where always very considerate. Although we saw a lot of Cosplay groups it was always very silent and everyone tried their best not to disturb others, even if someone blocked the whole hallway. They just waited patiently.
 |
| Picture by Meermiau |
The food was very good and we really enjoyed the affordable flash rental service.
You could feel that the studio do his best to fulfill every need a Cosplayer might have during a shooting.
It was an amazing experience and I would recommend everyone to try it out once!
If you have any questions, please feel free to ask.
Jan 7, 2016 | Cosplay, Cosplay Tutorial, Japan, Travel, Travel Reports, Uncategorized |
 |
| Picture by Meermiau |
Japan is the wonderland for every Cosplayer.
You have shops where you can get wigs, Cosplays and accessories. You have Cosplay events and even photo studios with a Cosplayerfriendly environment.
For Japanese Cosplayer, using a Cosplay photo studio is very common.
Instead of wandering around and searching for the perfect location you just look up a photo studio with a suitable setting and just booked it.
Cosplay photo studios in Japan have special furnished rooms with a themed setting (and if you need; just a white/ black wall).
Most of the studios are providing several settings to fulfill the needs of their customers. They also have changing rooms, lockers and are equipped with amenities like hairspray, bobby pins and more. Most of the studios also provide camera (equipment) and Cosplay accessory rental.
 |
| Share Photostudio |
 |
| Picture by Meermiau |
The most important things you should know:
1. Cosplay photo studios are not made for foreigners.
If you cannot speak Japanese, you should learn it or take a Japanese speaking friend with you.
At some studios you need to fill out Japanese forms to get in.
English speaking staff is very rare (like everywhere in Japan). I once visited a studio with friends and the staff where searching non stop for me, because they wanted to speak with my friends. Although my friends are very considerable they nearly got kicked out. Japanese studios have a lot of rules and most of them aren’t obvious. Of course the rules are displayed but only in Japanese.
I also red that even Japanese students or people who lived several years in Japan had problems regarding to the forms and communication. So be prepared.
If you cannot bring a Japanese speaking friend or speak Japanese there are a few studios which are used to foreigners. You can recognize them easily: they offer an English website and reservation. But be aware that English website doesn’t mean that the staff can speak English.
I would recommend Studio crown in Akihabara (Tokyo). A friend of mine owns this studio. She can understand German and speaks fluently English, because she lived abroad.
Her studio also offers a special Cosplay dressing and photo service for foreigners.
2. Also be aware that you need to book some studios before head.
The website is mostly Japanese and due to security reasons and pictures as buttons you cannot translate via Google translate (or other services) easily.
My Japanese friend recommends always reserving the studio before head. At some studios you need a membership to get in. The reservation progress can be very complicated and might require a Japanese address or phone number.
We couldn’t reserve before head, because my friends couldn’t create an online account so we just walked in. I guess, as long it is a share studio and you are going for a normal working day it should be fine. If you want to get a private room or to shoot on holidays you should reserve.
Of course it depends on the studio itself.
3. Always dress up at the studio and change back to your normal cloths after the shooting.
In Japan there is an unspoken rule to change at the location itself.
If you come dressed in Cosplay they might refuse your entry.
The studios are providing a changing room, lockers and a Cosplay friendly environment. You should know that the changing room will be a big hall where everyone will sit on he floor and change.
You should bring a small mirror and try not to spread you things too much in order to leave as much space as possible for other visitors.
4. Don’t cut your wig in the changing room and always clean your shoes before entering a setting.
Sometimes you even have to put off your shoes.They mostly provide special tissues for the shoes, a shoe shelf and rooms for wig cutting. Some studios also have rules regarding to the skirt length or that you have to wear a shorts under your shirt.
If you are the one taking pictures, be aware that there are often regulations regarding the camera equipment. Because some settings are the hallway itself (which everyone uses to move around) you are maybe not allowed to use more than one soft box and only a limited number of flashes.
5. The most studios don’t provide a photo service.
Japanese Cosplayers are mostly visiting the studios in a group and are taking pictures of each other.
It is quite uncommon to come with your own photographer.
You can rent a camera + equipment at the studio itself. Cosplayers at a studio normally don’t communicate much with other Cosplayers and are staying in their group.
So if you want to make new friends a studio might be the wrong place.
The studios
Japan has a big variety of Cosplay photo studios. You can mostly rent them for 1 hour, 3 hours, half a day and a whole day. Some rental time does include your changing time some not. Just be careful to check it if you are going for a Cosplay that takes some more time to change in order not to use up your precious shooting time.
You can divide the studios into 3 different main types:
1. The share studio
At the share studio you are paying an entry fee per person and are free to use every setting which is not occupied.
You are paying an affordable fee and can use a lot of different settings. It is kind of “all you can shoot”. If you forgot to reserve you can try to get a ticket right on that day and hope that there are still tickets left.
The disadvantage: If you want to use a certain setting you might have to wait and you cannot occupy a space for several hours, because other people might wait for this certain setting (Japanese people won’t wait obviously).
Because some settings are placed at the hallway and you are sharing the space with other foreign people. You have to obey a lot of rules and always have to consider other Cosplayer using this studio.
Price range:
About 1.000 en (1 hour) to 5.000 yen (10 hours)
 |
| Picture by Meermiau |
2. Private studios
You also have the possibility to rent a private studio.
You are paying a fee per room (or a group of rooms). Because you are renting the room for your usage only, be prepared to pay for it.
Because you are paying per room, you have the possibility to invite friends for a shooting and to share the costs. Although it is expensive at the first glance it might become affordable. If you want to rent a private studio, a reservation is required and a reservation in Japanese might become very challenging.
It might be more expensive than a share studio, but you can use the place more freely without worrying about other foreign Cosplayers and disturbances.
Because the share studios are cheaper, you will find a lot of pictures taken at the same setting again and again. So if you are searching for a more unique setting, I would recommend going for a private studio.
Price range:
About 3000 yen (1 hour) to unlimited
 |
| Shooting at a Hotel |
3. Hotels
Some Hotels are offering a Cosplay photo studio service next to their main business. Or if you are going to stay in a very special hotel /Ryokan just ask them if you can shoot there.
You are just booking a room (mostly special furnished ones or with features like a pool) and just use it as a shooting location. Some hotels are offering their rooms for rental at the day time and for staying at the night time. Some Hotels also offer both.
Normally you are paying per room (or per person if you also want to stay in this room). They are mostly not equipped with rental services, don’t have Cosplay related staff and changing rooms.
Bear in mind that their main business is not to be a Cosplay studio. But these rooms are mostly equipped with an en suite bathroom. So changing and getting ready is possible in a private environment.
You also can share the hotel room to save money and to stay over with friends after the shooting. It is a nice combination if you want to spend a night in a nice Hotel and to take some pictures.
Price range:
About 4000 en (1 hour) to unlimited
Renting things:
In Japanese Cosplay studios you can rent camera equipment, light equipment and a variety of accessories.
So you don’t have to bring more than Cosplays and Make-up. It is a quite comfortable service particularly if you are coming from oversees and struggle with your limited baggage space.
1. Cameras and equipment:
The most studios offer free reflectors and are using artificial day light to light up the studios. But if you still want to use a soft box or flash you can rent it right at the studio itself. Nearly every studio also offers a camera rental.
Some studios are only providing Nikon or Canon equipment. So it might be difficult to get a fitting flash.
I also saw that the prices are varying from studio to studio. Some studios are offering a free rental for 2 hours, some 300 yen per hour, and some 300 yen for a whole day. So be sure to check the prices in order to get the equipment you want and not to spent a fortune.
 |
| Rentel items at studio crown |
2. Cosplay accessories:
Most of the studios are offering a rental service for Cosplay accessories like micros, schoolbags, fake food, umbrellas etc.
This service also varies from studio to studio. While one studio might offer a very limited choice the other studio might have so many accessories, that you have difficulties to choose. Some studios tend to give them out for free, while other studios charge you per item.
I really love to use accessories so I tend to choose my studios (next to the entry fee and settings) based on the variety of accessories. Until now I only used studios which are giving their Cosplay accessories out for free.
Also be careful when you are choosing a studio. The entry fee might be very cheap but if you intend to rent equipment or additional items it might be cheaper to go for a more expensive one.
I hope that this guide might help you for your next time in Japan.
I really recommend every Cosplayer to visit once a Cosplay photo studio. Compared to Germany the shooting possibilities seem unlimited.
It is really a great feeling to shoot at a Cosplayerfriendly environment and to shoot at special locations freely without worrying about publishing rights, unaffordable fees and people who are not familiar with Cosplay.
Next time I will right about the Cosplay studio and the Hotel I used during my last Japan trips.

 For the waiting time you are free to use the kitchen (fully equipped) free Wifi, the small library in the waiting room or the Pokestop directly at the Studio.
 You could feel that they were just bought randomly. I am used to rental props which are compatible to each other in several ways for several purposes.
 My opinion:
 You are not allowed to eat or drink in this room (only in the changing room and technical room) and need to put of your shoes.
 We booked Studio 6 for the Waterworld. You can also rent this studio without the waterset option for 17 Euro per hour. You pay an additional fee of 40 Euro for the water option.
 The Waterworld offers 3 different watertypes:
 The Studio 6 is a closed black room, which is why you are allowed to splash around however you like. You just need to be careful to a certain corner were the batteries and flashes are stored.
 My opinion:

 If you need a simple studio, reasonable priced with good light equipment this studio is the best choice you can take. The light equipment is included (high quality flashes) and if you share the rental fee with some friends it is super affordable.